This question originally appeared on Quora.
Question details: The span should be 75 cm, with no maximum depth. The bridge will be loaded midspan, like a point load, and there’s no limit on the number of Popsicle sticks, but there’s a 1 kg maximum weight, so strength-to-weight ratio must be greater than 250.
Answer by Isaac Gaetz, licensed structural engineer:
Courtesy of Isaac Gaetz
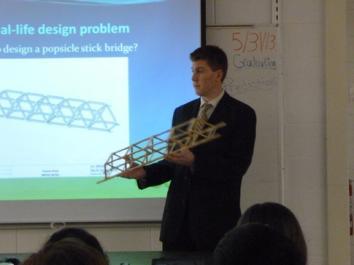
I designed a quick one of these a few months back. It was for a presentation I gave for some middle-school students. To the left is an image of me holding the bridge. It was not something I put a tremendous amount of effort into, just a quick and dirty design to show the concept. Behind me, you can see an image from the computer program I used to model and design the bridge.
I did not build the physical model that you see me holding—a co-worker did, and he did not follow my directions perfectly. He accidentally transposed certain critical areas that needed additional reinforcing with areas that did not require reinforcing. This resulted in the bridge carrying 50 pounds at the time of failure. With my original design, the bridge would have held more than 100 pounds quite easily.
Now, if I were actually designing something to use in a competition and there were few restrictions, I’d design something substantially different. From the specifications of this question, I know the bridge needs to span 75 cm, the loading will be from a point load in the middle of the span, the builder is allowed to use nylon threads, and there is no maximum depth for the span.
Any structural engineer will recognize this diagram as a shear and bending moment diagram for a simply supported beam with a point load at midspan. The bottom, triangular graph is the bending moment. What we can see here is that the bending moment is maximum at midspan, zero at the ends, and increases/decreases linearly between these two.
Because the anticipated load (250 times the weight of the bridge) is so high, the diagram is a good approximation for the true bending on our bridge, and it is not necessary to account for the bridge’s self weight. As such, we need to design our bridge for the bending diagram and shear loading.
Because efficiency is our goal, there is no reason to provide excess capacity in low stress regions. What this means in practical terms is that we should make the bridge strongest in the middle and not worry too much about the ends (more about the ends later). The most efficient way to increase the bending strength of a member, truss, etc, is to increase the depth. This is because the moment of inertia (the geometric property associated with bending strength) increases linearly with increases in width but cubically by increases to the depth. (A beam that is 4-by-4 has only two times the bending strength of a 2-by-4, while a 2-by-8 has approximately four times the bending strength of a 2-by-4, even though the area of a 4-by-4 is roughly equal to a 2-by-8.)
So a shape with maximum depth in the middle and minimum at the ends will look very much like the bending moment diagram. Here are some classic wood truss shapes to give you the rough idea.
There is no specific reason that we have to only consider “upward options.” We could try something like this or even this, but we don’t have to be limited by those designs. Remember, we are carrying only one point load, so we need to ensure we have strength right at the midspan. We also have the benefit of nylon cord.
Disclaimer: I haven’t weighed or checked the properties on nylon cord, so the following is based on an unverified assumption that the nylon cord has a higher tensile strength-to-weight ratio than the Popsicle sticks. If this proves to not be the case, discard the cord and do not use it.
Anyhow, assuming the cord does indeed have useful properties, the cord can be used to replace tensile members in the bridge. Which members are in tension? The key is to follow the load path. But I will also cut to the chase and let you know that in this simple case, the bottom members of the above trusses are always in tension.
This leads to a combined cable and Popsicle-stick design. How about something like this?
What is interesting about this is that it is no longer actually a truss at all—it is a tied arch. If this is done right, we can design the upper arch portion out of Popsicles to take only compression load, and the nylon cable will take all of the tension. This would be great if our loading was uniform and distributed across the arch, but because we have that pesky midspan point load, it is difficult to keep the arch from bending locally, which is suboptimal.
So, what we really need is something closer to this.
Now, we don’t need all the handrails, decking, etc, but what we see is the use of a tensioned cable to create the bottom cord of the truss. The cable is incredible strong and can be run continuous between the supports, reducing the number of connections that can fail in the structure.
So that is our basic design: a truss with a tensioned cable bottom cord. Now, what about the finer details?
Remember above when I said we can focus primarily on the midspan? That is still true, but we do have to give our supports some thought. We don’t want our truss to fail by shearing off. In practice, if I were designing this bridge, I’d verify that the ends are sufficiently strong to not crush, deform, or fail in shear under the expected loading.
Next comes connections. No matter how strong the theoretical design of the bridge is, and no matter how strong the individual sticks and cables are, they will be nothing if the connections fail prematurely. Gluing sticks together on their face is fine, but I suggest taking it the extra mile and drilling the sticks and creating tiny doweled connections. (Verify with your instructor is this acceptable.) If you do this, you’ll create very strong, very rigid joints that are unlikely to fail. If you can’t use a dowel, you might still be able to strengthen the joints by drilling them and running a tiny piece of cable through as a tie.
The connection where the main cable ties meet the top cord of the bridge at the two bridge ends is the most important connection on the structure. If this fails prematurely, the entire structure is doomed. I suggest building a mockup and testing this connection in several iterations to make sure it is very strong.
Now, how about going the extra mile to really try to win this thing? if you really want to optimize your bridge, first, go through all your Popsicle sticks and only work with the best ones. Throw away any sticks with knots or other defects. Next, make sure all gluing is done at least few days before testing, to ensure the bridge is fully cured. Then consider drilling regular, small holes into the Popsicle sticks to reduce their weight. The math is too complicated to go into, but suffice it to say, if you keep the holes small enough, the Popsicle sticks won’t fail locally at the holes. These holes will reduce the weight of the bridge a small amount, increasing the efficiency. Finally, when installing the bottom cable, do not allow any slack in it. Instead, pull the cable extra tight. If you can introduce some pretension force into the cable, this will provide an initial counterbalancing force to resist the applied loads. Be careful though: Don’t crush your bridge when you apply the tension.
More questions on Design: