This post originally appeared on Food52.
By now we know that no-knead doughs—as dubious as they might sound—aren’t an oxymoron or a lie. You can stir together a dough, largely ignore it, and the next day have bread—some of the more richly flavored, handsomely bubbled and crusted bread out there. Kneading is really going to have to make a stronger case for itself. Like the fanny pack has.
This is all because there’s more than one way to build the strands of gluten that bread needs to trap air bubbles and form beautiful honeycombed networks of delicious carbohydrates and air: The first way is by agitating and working the dough (traditionally: kneading); the second is simply with time.
In this genius challah recipe from Stir author and Sweet Amandine blogger Jessica Fechtor, the agitation comes in the form of a fold: a straightforward move (like the thing you did to all your socks last laundry day), which you’ll do just five times, over long, inactive stretches. Time makes the bread, really—you just keep it organized.
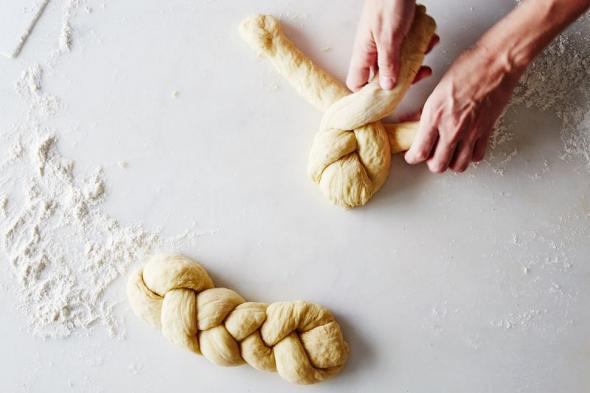
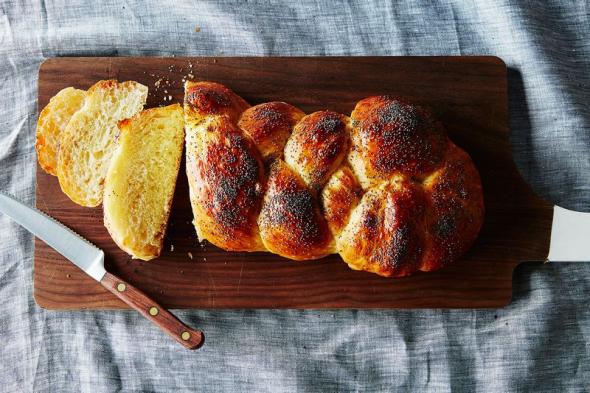
Photo by Bobbi Lin
Fechtor learned about the folding technique from her friend Andrew Janjigian, who happens to also be a senior editor at Cook’s Illustrated and a bread genius. At the time, she was testing all sorts of different ratios and timing to perfect her challah and, though the flavor and texture weren’t bad (and especially not bad when warm from the oven), it was lacking a structural subtlety that she missed from her undergrad days at Columbia, where the challah at the University Food Mart pulled apart in soft, flaky tufts, like gauzy strands of cotton candy.
Janjigian told her that, rather than kneading, she should try intermittently folding her dough, simply drawing up the edges like a little coin purse, then flipping it over and letting it sit and slump again.
Not only did this subtle change in timing and motion create exactly the wispy texture she was looking for, but the active-then-inactive development rhythm made a bread with more longevity, too. “You could eat a rubber shoe out of the oven and it would taste good,” Fechtor told me. But this loaf is just as good after three days in a Ziploc as it is freshly baked—without toasting, or butter, or other classic stale bread revival tricks.
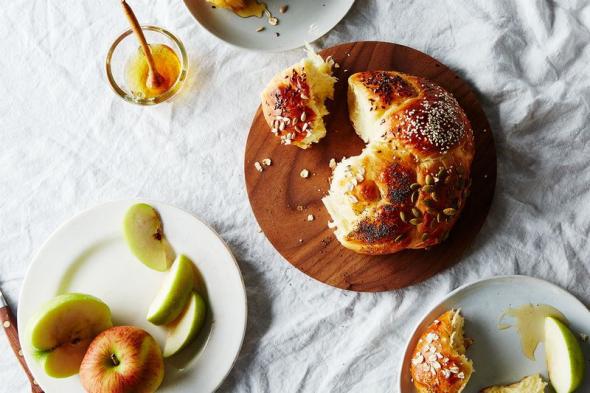
Photo by Bobbi Lin
Post-folding, she’s designed the rest of the recipe to be essentially error-proof at every stage. A cold overnight rise helps slowly develop the flavor and structure of the bread in the refrigerator, where chances of over- or under-proofing are slim.
Then, after pulling it from the fridge and making two little braids, you leave them to rise again, as she instructs, just till they appear swollen and hardly spring back when you sink a finger in.
Rather than relying on murky clues like thumping a loaf on its bottom, she recommends a cake tester or a straight thermometer reading (190° F), which is a last stroke of genius for newbie bread bakers.
If you’ve always wanted to make your own bread but feared your lack of intuition, all you have to do is treat it with the precision of baking a cake—let simple kitchen tools take away the anxiety of knowing, until you feel comfortable enough to go with your gut. Fechtor has set it up so that this challah will go well, whether it’s your first or your 400th.
This all might sound like a lot to keep track of, but I am a person who has a special impatience, and even I found this to require very little of me—no more than a half hour of paying attention overall. (I also have a special sense of time management, so take that as you will.) Plus, all the timing prescriptions are flexible: “Sometimes I’m giving my kids a bath and I’ll do one fold in 45 minutes, the next one in 20 minutes,” instead of precisely 30 minutes every time, Fechtor told me. She’s even skipped the overnight rise in the fridge, adding a couple extra folds to compensate, then chilling only long enough to make the dough easier to work with.
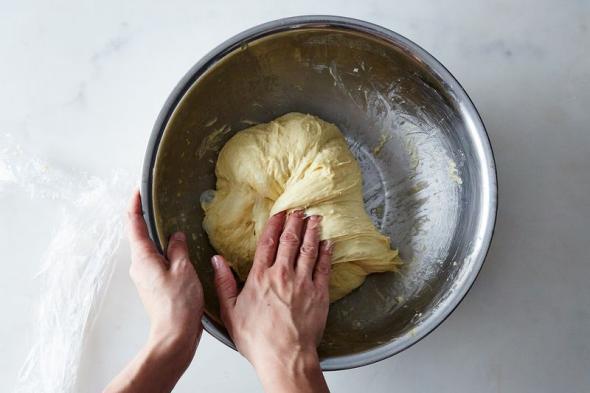
Photo by Bobbi Lin
“I’ve played this recipe really fast and loose and it’s always come out great,” she said. I too have forgotten to set my timer more than once, and the bread has apparently not been the wiser. (Pro tip: Set all your reminders to fold at the start—as alarms on your phone, so you never forget to keep resetting the timer.)
Lately, Fechtor has taken to rolling out the chilled dough, speckling it with cinnamon, sugar, and raisins, then curling it up into a cinnamon swirl loaf (or braiding it into an even sweeter challah).
“When the dough is so easy to work with, it just unlocks things,” Fechtor told me. You could apply this folding technique to your family’s own challah recipe, or other breads, even Liège waffles and buttermilk biscuits (she has). “The moral of this story is to fold everything and everything will be awesome.”
Jessica Fechtor’s Five-Fold Challah
Slightly adapted from Stir
Makes two loaves
Dry ingredients:
4 cups (500 grams) bread flour
1½ teaspoons instant dry yeast
2 teaspoons fine sea salt
Wet ingredients:
2 large eggs plus 1 large egg yolk (save the extra white in a covered glass in the fridge for glazing later on)
¾ cup (190 grams) water
⅓ cup (75 grams) olive oil
¼ cup (85 grams) honey
See the full recipe at Food52.
Got a genius recipe to share—from a classic cookbook, an online source, or anywhere, really? Please send it my way (and tell me what’s so smart about it) at kristen@food52.com. Thanks to Food52 contributors editor Sarah Jampel for acting as official challah consultant!
More from Food52:
The Late Night in Puglia That Gave Us Martha Stewart’s One-Pan Pasta (Plus 7 New Ones)
Jim Lahey’s No-Knead Pizza Dough
18 Rosh Hashanah Recipes for a Sweet New Year
How to Get the Best Results From Your Baking Books
Josey Baker’s 10 Essential Tools for Baking Delicious Bread
Get the Right Water Temperature for Yeast Without a Thermometer